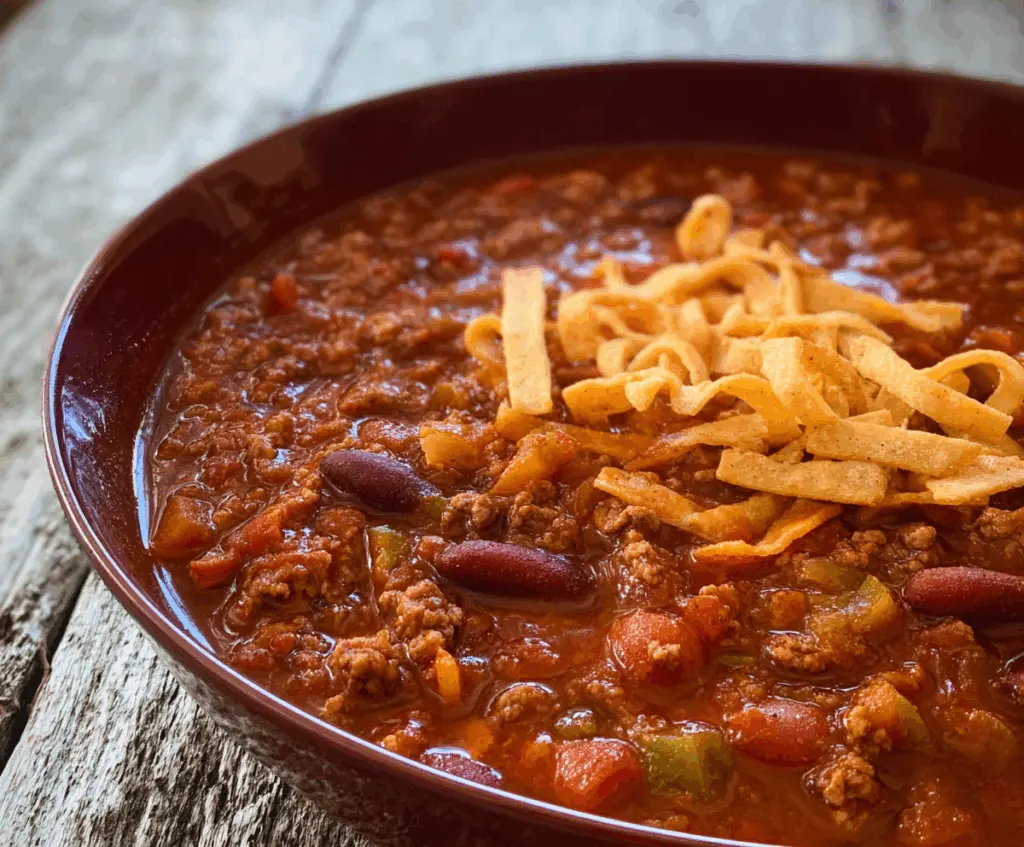
Hillbilly Chili is a hearty, comforting bowl full of bold flavors and down-home goodness. It’s packed with tender ground beef, beans, tomatoes, and a good kick of spices that warm you right up. This chili has that perfect thick, chunky texture that’s easy to love on a chilly day or anytime you want a satisfying meal.
I love making Hillbilly Chili on weekends when we have friends over or just want something simple to enjoy without fuss. It’s one of those dishes that fills the house with a cozy smell and invites everyone to grab a big bowl and dig in. I like to let it simmer slowly so all the flavors blend together just right—that’s when the magic happens.
My favorite way to serve this chili is spooned over a bed of cornbread or with some crispy tortilla chips on the side. A little shredded cheese and a dollop of sour cream on top never hurt either! It’s the kind of meal that feels like a warm hug and always brings people around the table for good conversation and laughs.
Key Ingredients & Substitutions
Ground beef: This is the heart of your chili. I prefer lean ground beef for less grease but ground turkey or plant-based crumbles work well too if you want a lighter or vegetarian option.
Onions and green bell peppers: They add sweetness and crunch. If you can’t find green peppers, use red or yellow bell peppers for a milder, sweeter taste. Frozen diced veggies also work fine on busy days.
Beans: Kidney beans are classic, but you can use pinto beans or black beans instead, depending on your taste or what you have on hand.
Chili powder and spices: The chili powder brings the bold flavor here. If you’re short on chili powder, try a mix of paprika, cumin, and a pinch of cayenne pepper. Adjust heat by adding or skipping the cayenne.
How Do You Get Chili Thick and Full of Flavor?
Thick, tasty chili comes from slowly simmering so flavors blend and liquid reduces. Here’s how I do it:
- Brown the meat well to develop a rich base.
- Toast the spices in the pot after browning meat—they release more aroma and depth.
- Add liquids, then simmer low and slow for at least 30 minutes, stirring occasionally to prevent sticking.
- Leave the lid slightly ajar while simmering to help some liquid evaporate for thicker chili.
- Taste and adjust seasoning right at the end—sometimes a pinch of salt or a dash of sugar brings balance.
This slow simmer brings out all the deep flavors you want in Hillbilly Chili and gives it that hearty texture your spoon will love!

Equipment You’ll Need
- Large heavy-bottomed pot or Dutch oven – I prefer this because it heats evenly and helps simmer the chili gently without burning.
- Wooden spoon or spatula – perfect for stirring everything and breaking up the meat as it cooks.
- Measuring spoons and cups – for accurate seasoning and liquid measurements.
- Can opener – essential for opening the tomatoes, beans, and sauce.
- Serving bowls and toppings – for all the crunchy chips and toppings to finish your chili.
Flavor Variations & Add-Ins
- Swap ground beef for sausage or ground turkey for a different flavor profile. It cooks just as well and offers a new taste.
- Add chopped jalapeños or hot sauce if you like extra heat—perfect for those who prefer spicy chili.
- Mix in chopped corn or diced sweet potatoes to add sweetness and texture, especially good in fall or winter.
- Use shredded cheddar or Monterey Jack cheese on top for creaminess—who doesn’t love cheesy chili?
Hillbilly Chili
Ingredients You’ll Need:
- 1 lb ground beef
- 1 medium onion, chopped
- 1 green bell pepper, chopped
- 2 cloves garlic, minced
- 1 (14.5 oz) can diced tomatoes
- 1 (15 oz) can kidney beans, drained and rinsed
- 1 (8 oz) can tomato sauce
- 1 cup beef broth or water
- 2 tbsp chili powder
- 1 tsp ground cumin
- 1 tsp smoked paprika
- ½ tsp cayenne pepper (optional, for heat)
- Salt and pepper to taste
- 2 tbsp vegetable oil or cooking oil
- Frito corn chips or tortilla strips for topping
How Much Time Will You Need?
This Hillbilly Chili takes about 10 minutes to prep and around 30 minutes to cook. Total time is about 40 minutes, perfect for a quick and comforting meal after a busy day.
Step-by-Step Instructions:
1. Sauté the Vegetables:
Heat 2 tablespoons of oil in a large pot over medium heat. Add the chopped onion and green bell pepper. Cook, stirring occasionally, until they soften and become a little tender, about 5 minutes.
2. Add the Garlic and Brown the Meat:
Stir in the minced garlic and cook for 30 seconds until you can smell it. Then add the ground beef. Cook it thoroughly, breaking it apart with a spoon, until no pink remains.
3. Season the Chili:
Mix in the chili powder, cumin, smoked paprika, cayenne pepper if using, along with salt and pepper to taste. Stir and cook for 1-2 minutes to let the spices toast and release their flavors.
4. Add Tomatoes, Beans, and Broth:
Pour in the diced tomatoes, tomato sauce, kidney beans, and beef broth. Stir everything together well and bring it to a gentle simmer.
5. Simmer the Chili:
Reduce the heat to low. Cover the pot and let it simmer gently for at least 30 minutes. Stir now and then to avoid sticking. This simmering time helps blend all those tasty flavors together.
6. Final Taste and Serve:
Give your chili a taste and add more salt or pepper if needed. Ladle the chili into bowls and top with crunchy Frito corn chips or tortilla strips for that classic Hillbilly touch. Enjoy your hearty, comforting meal!
Can I Use Frozen Ground Beef for This Chili?
Yes, you can! Just be sure to fully thaw it in the refrigerator overnight before cooking. This helps it brown evenly and prevents excess moisture in the chili.
Can I Make Hillbilly Chili Ahead of Time?
Absolutely! In fact, chili tastes even better the next day as the flavors have had time to meld. Store it in an airtight container in the fridge for up to 3 days and reheat gently on the stove.
What Can I Substitute for Kidney Beans?
If you don’t have kidney beans, pinto beans or black beans are excellent alternatives. Just drain and rinse them before adding to the chili.
How Do I Store Leftover Chili?
Keep leftovers in an airtight container in the refrigerator for up to 3 days or freeze for up to 3 months. When reheating, thaw frozen chili in the fridge overnight and warm it slowly on the stove.