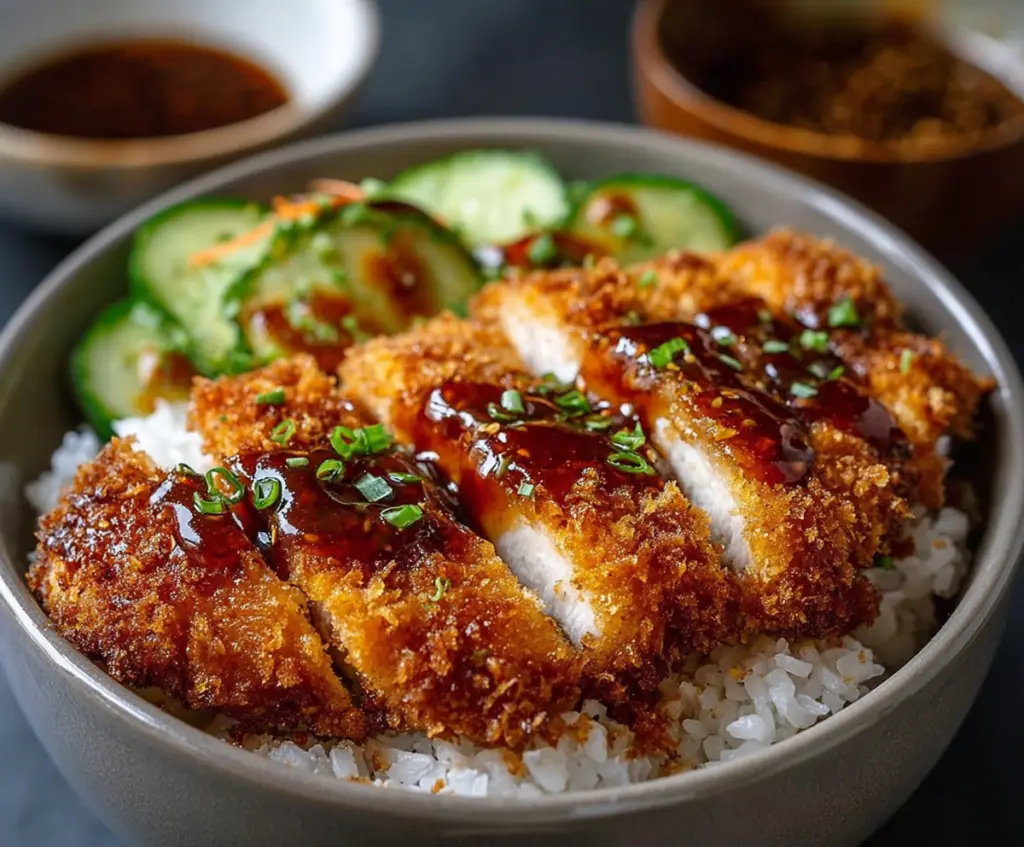
Japanese Katsu Bowls with Tonkatsu Sauce are a delicious mix of crispy breaded pork or chicken served over a bed of fluffy rice, drizzled with that sweet and tangy tonkatsu sauce. The crunch of the katsu paired with the rich, flavorful sauce makes this dish a favorite for many. It’s simple but so satisfying, with every bite bringing together textures and tastes that just work perfectly.
I love making these bowls when I want something comforting but not complicated. The crispy coating on the meat is my favorite part—it’s crunchy on the outside and juicy inside, and the tonkatsu sauce adds just the right touch of zing to keep things interesting. I usually add some shredded cabbage or pickles on the side because they add a nice fresh crunch that balances the meal.
This dish is a go-to for me on busy nights when I want a homemade meal that feels special but comes together quickly. It’s also great for sharing because you can make a big batch and everyone can add their favorite toppings or veggies. I always feel happy serving these bowls because they remind me of those fun times eating with friends at Japanese restaurants, but with the comforts of home cooking.
Key Ingredients & Substitutions
Pork or Chicken: Pork loin or chicken breast works well for katsu. Pork tends to be juicier, but chicken is leaner. If you want, you can also use turkey cutlets or even tofu for a vegetarian option.
Panko Breadcrumbs: Panko gives that light, crispy texture that regular breadcrumbs can’t match. If you can’t find panko, crushed cornflakes or crushed crackers work as a decent substitute.
Japanese Short-Grain Rice: This sticky rice is key for authentic katsu bowls. If it’s not available, use any medium-grain rice and cook it so it’s slightly sticky, which helps hold the bowl together.
Tonkatsu Sauce: The sauce balances sweet and tangy flavors. If you don’t have mirin, you can replace it with a splash of rice vinegar plus a pinch of sugar. Worcestershire sauce is optional but adds that nice depth.
How Do You Get the Crispiest Katsu Coating Without It Getting Greasy?
The secret to perfect crispy katsu starts with the breading and frying technique.
- Dry the meat well before breading—this helps the coating stick better.
- Use panko breadcrumbs for a light and crunchy crust.
- Set up a proper breading station: flour first (to dry the meat), egg next (acts as glue), then panko.
- Heat the oil to medium (around 350°F) so the coating crisps quickly without soaking up oil.
- Fry in batches so the oil temperature stays stable and doesn’t drop.
- After frying, place the katsu on a rack or paper towels to drain excess oil.
These steps help you get a crunchy outside and juicy inside without extra greasiness. It takes a bit of care but is worth it for the perfect katsu!
Equipment You’ll Need
- Sharp knife – helps you slice the meat evenly after frying.
- Shallow bowls or plates – for breading station with flour, eggs, and panko.
- Large skillet or frying pan – for frying the breaded meat in enough oil to coat the bottom.
- Cooking thermometer – to check that the meat reaches safe internal temperature.
- Paper towels or wire rack – to drain excess oil and keep the katsu crispy.
- Measuring spoons and cups – for making the sauce accurately.
Flavor Variations & Add-Ins
- Proteins: Use chicken thighs or fish fillets instead of pork or chicken for a different flavor.
- Cheese: Add a slice of melting cheese like Swiss or cheddar inside the katsu for extra richness.
- Veggies: Top with shredded cabbage, carrots, or pickled vegetables for added crunch and flavor contrast.
- Spices & Sauces: Mix a little sriracha or chili sauce into the tonkatsu sauce to add heat, or sprinkle sesame seeds on top for nuttiness.
Japanese Katsu Bowls with Tonkatsu Sauce
Ingredients You’ll Need:
For the Katsu:
- 2 boneless pork chops or chicken breasts (about 1/2 inch thick)
- Salt and pepper, to taste
- 1/2 cup all-purpose flour
- 2 large eggs, beaten
- 1 cup panko breadcrumbs
- Vegetable oil, for frying
For the Rice Bowl:
- 2 cups cooked Japanese short-grain rice (warm)
- 1 cup thinly sliced cucumber
- 2 tbsp finely chopped green onions (for garnish)
For the Tonkatsu Sauce:
- 1/4 cup ketchup
- 2 tbsp Worcestershire sauce
- 1 tbsp soy sauce
- 1 tbsp mirin (sweet rice wine)
- 1 tbsp sugar
- 1 tsp Dijon mustard (optional)
How Much Time Will You Need?
This recipe takes about 10 minutes to prepare, 15 minutes to cook the katsu, and just a few minutes to assemble the bowls. In total, you can expect to spend around 25 to 30 minutes from start to finish.
Step-by-Step Instructions:
1. Make the Tonkatsu Sauce:
In a small bowl, whisk together ketchup, Worcestershire sauce, soy sauce, mirin, sugar, and Dijon mustard until everything is smooth and well mixed. Set aside so the flavors can blend.
2. Prepare the Katsu:
Season your pork or chicken evenly with salt and pepper. Set up a breading station with three shallow dishes: one filled with flour, one with beaten eggs, and one with panko breadcrumbs.
Coat each piece of meat by first dredging it in flour, shaking off any excess. Then dip it into the beaten eggs, making sure it’s fully coated. Finally, press it thoroughly into the panko breadcrumbs to get a nice even crust.
3. Fry the Katsu:
Heat about 1/2 inch of vegetable oil in a large skillet over medium heat until it’s hot but not smoking. Carefully fry each piece of breaded meat for about 3 to 4 minutes per side or until golden brown and cooked through. Use a food thermometer to check—pork should reach 145°F (63°C) and chicken 165°F (74°C).
Remove the cooked katsu and drain on paper towels. Let it rest for a couple of minutes before slicing into strips.
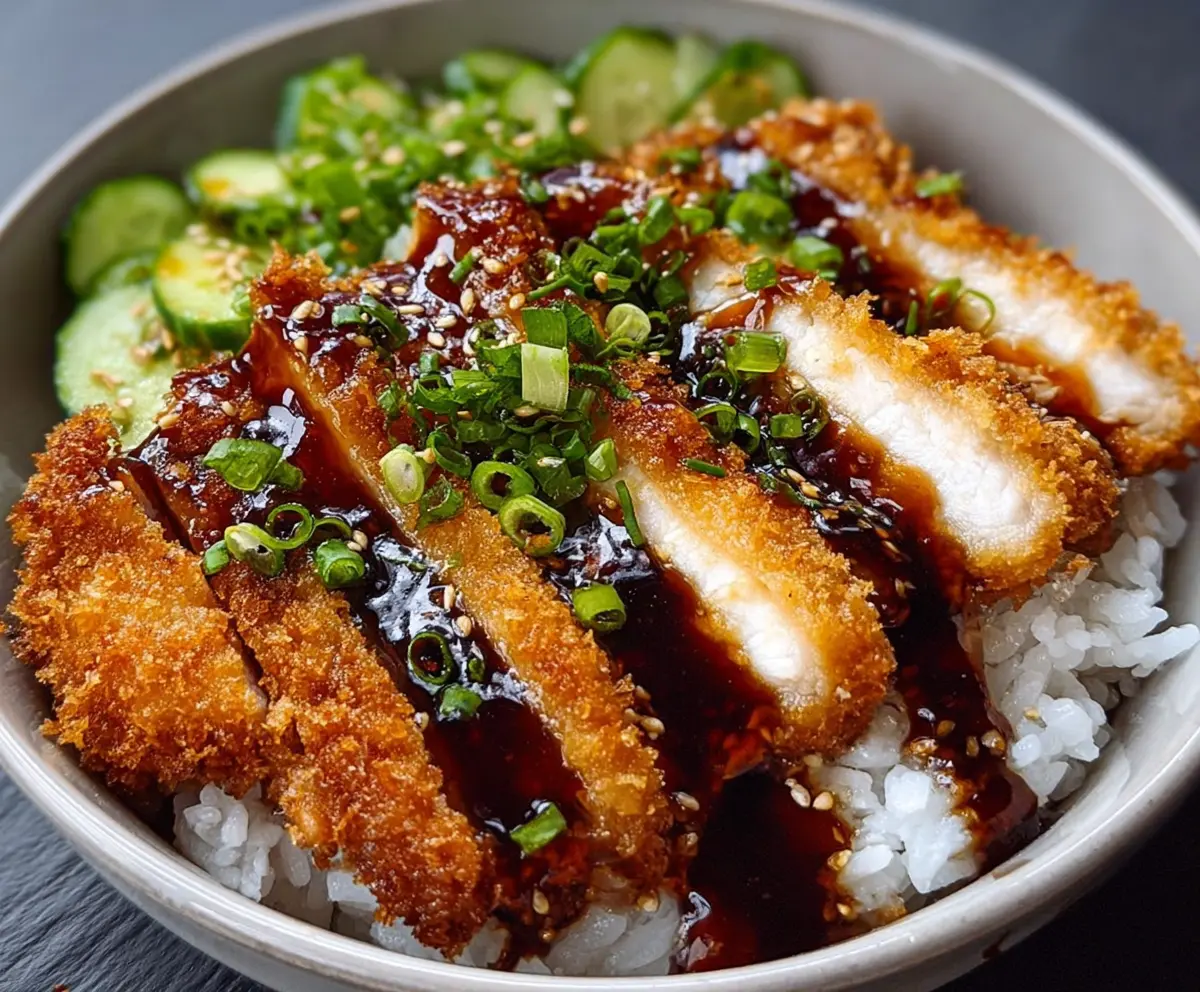
4. Assemble the Bowls:
Divide the warm cooked rice into serving bowls. Arrange the sliced katsu on top and drizzle generously with your homemade tonkatsu sauce.
Add the thinly sliced cucumber on the side or over the top for a cool, crunchy finish. Sprinkle finely chopped green onions for a fresh burst of flavor and color.
5. Serve and Enjoy:
Serve your Japanese Katsu Bowls warm and enjoy the delicious combination of crispy, juicy katsu with tangy sauce and fresh cucumber. It’s a simple, satisfying meal that’s perfect for any day!
Can I Use Frozen Meat for Katsu?
Yes, you can use frozen pork or chicken, but make sure to thaw it completely in the fridge overnight before breading and frying. This helps the coating stick better and ensures even cooking.
How Can I Make This Recipe Gluten-Free?
Use gluten-free flour and gluten-free panko breadcrumbs. Also, double-check that Worcestershire sauce and soy sauce are gluten-free or replace them with tamari and gluten-free Worcestershire alternatives.
Can I Bake the Katsu Instead of Frying?
You can bake the breaded meat at 425°F (220°C) on a wire rack for about 20-25 minutes, flipping halfway, but frying will give you the crispest texture. Baking is a great option if you want a lighter version.
How Do I Store Leftovers?
Store any leftover katsu and sauce separately in airtight containers in the fridge for up to 3 days. Reheat the katsu in a toaster oven or oven to keep it crispy, and warm the sauce on the stove or microwave.